

How to make my ‘Outside the Lines’ quilt
A couple of weeks ago I made this quilt. The whole quilt in one big week. It was for a project and had a deadline, but also it’s good for me to get a thing started and finished in a short amount of time. Sometimes I lose interest.
I had spent time before cutting the fabric on planning and ‘designing’ it. I say designing because it’s a combination of improv and pattern. Which I quite enjoyed doing. Having to constrain myself back to the pattern building blocks.
I named this quilt ‘Outside the Lines’ because, well because, it’s rectangles and blocks of colour set inside the white, and really I do like to think that I create outside the lines.
So, here’s the progress / process of the quilt. You can find the downloadable pattern sheet here and a full how-to make a quilt on my YouTube (I’ve barely anything there at the moment, but working on adding more. As a side-note, what would you maybe like to see on my YouTube channel?).
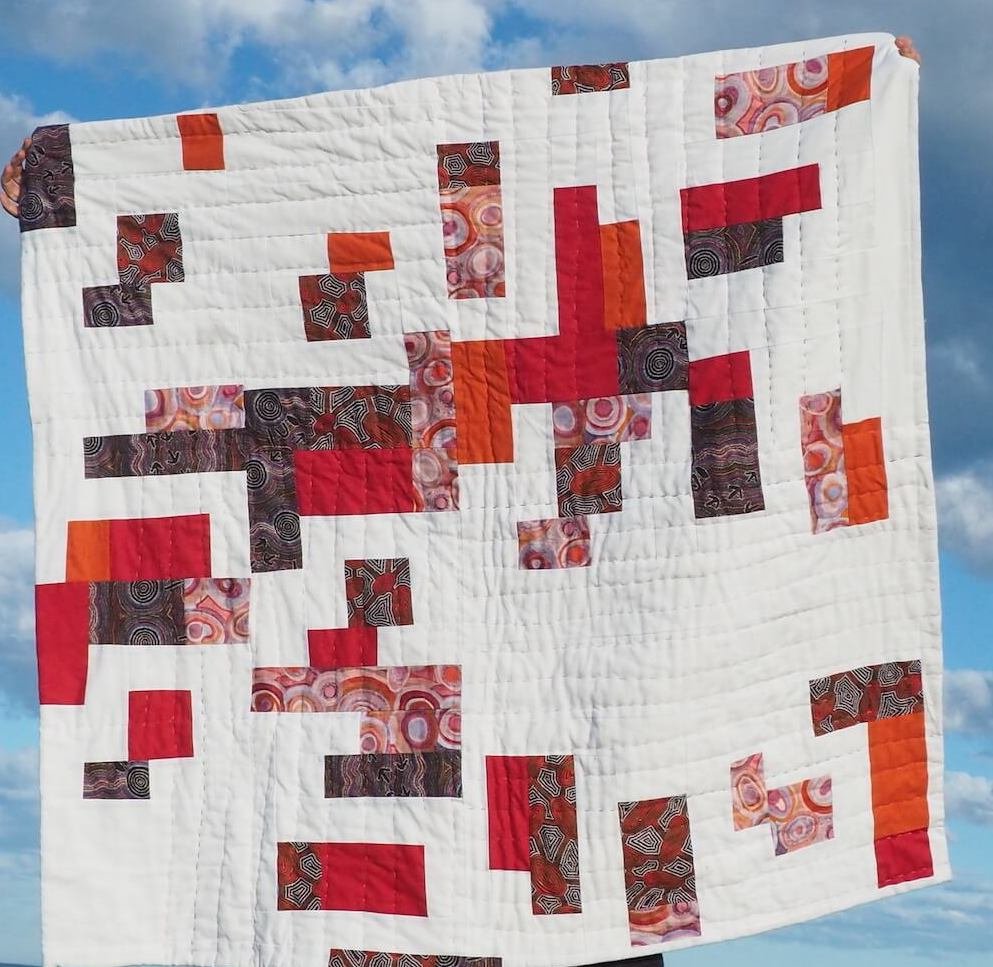

I used this beautiful fabric design, painted by artists from the remote community of Yuendumu, which is 290km northwest of Alice Springs. They paint and distribute their work under the Warlukurlangu name. You can read about the beautiful Indigenous artists and their work here.
To create some colour blocks alongside the vibrant prints I used two solids in what are called ‘pumpkin’ and ‘brick red’, and then white as the main back. The quilt backing is grey cotton with a cross hatch pattern.


The quilt is made up of two different quilt block patterns, which can be repeated as you prefer, and will depend also on how big you make the quilt. A smaller lap quilt might have 9 blocks, and these could be 4 of one style and 5 of the other style. If your quilt is bigger, say 12 blocks, maybe you’ll have 6 of each block style, or 5 of block A and 7 of block B.
For the backing of my quilts I like to use extra pieces from the front, sometimes there might be a block left over or some cut pieces the same dimensions as the font. While the back is completely different, I like that it has a cohesive colour story.
That’s where the quilt pattern becomes an improv quilt. You start with the making of each block and then use them as you like. I also like the idea of you choosing different prints and solids for each piece inside the blocks, so that each block itself is different.
Though having just written that, I might make one where they are all the same and see how that looks. Because, for fun.
I must admit I don’t usually make patterns and then repeat them. But now that I’ve actually made this pattern, why not. If I ever write this book that I want to write, then I will need to test the patterns and projects, and this is a good way to start.


The video takes you step by step through making the quilt. Though keep in mind that it’s a week of intense quilt-making condensed into 40-minutes.
For this quilt I used a rotary cutter and ruler, though often I use scissors in my quilting as I like the gentle flow that it adds. I do find that using straight measured lines in some quilts is necessary to keep it flat, and to minimise the potential for buckling and needing to remove excess fabric later on. Each quilt project needs to be taken with a different approach.
It does depend on the shapes and sizes of the quilt pieces, and the overall design that you’re working with. A lot of smaller fabric pieces can create more errors, whereas larger pieces might not be as difficult to fix. Though……there are no set outcomes with improv quilting, so we have to take each part as we approach it. But, with my ‘Outside the Lines’ quilt I wanted the lines as straight as possible, and I even measured and squared up each block.
As there is already a downloadable pattern here (and due to that being part of their website and the contract I can’t share it here), and the how-to quilt video here, I’m not going to share all of that on this post. I wanted to share some of the photos that I took along the way, as well as the finished quilt. And, to have it here on my blog rather than only in other places lost on the inter-webs.
{please note that all these fabrics were gifted by Spotlight, but this blog post is not sponsored by them}.